
.webp)
The tool, which has been part of the Microsoft world since 2016, is a so-called low-code solution that can automate simple, standardized and repetitive processes. This means that it also enables employees who have no idea about software development to carry out simple programming. This is thanks, among other things, to the Power Automate visual editor. Whether it's exporting from one format, such as here from Excel to SharePoint, to another, or automatically saving Outlook email attachments in One-Drive, or immediately saving survey responses to a selected storage location — there are hardly any limits.
Power Automate is essentially a tool to connect different apps together.
With Power Automate, you can not only create bridges and workflows between apps in the Microsoft world such as PowerBI, Power Apps, Office 365 with Word and Co. The tool also offers a plethora of interfaces to external services. These include Twitter, Dropbox and Google Drive, to name just a few examples. In total, there are already more than 100 systems that can be connected to Power Automate.
But enough of what Power Automate can do in theory. Let's roll up our sleeves and take a quick look at an example of how Power Automate works. Here we show you how to create an automation for data from a Microsoft Excel list to a SharePoint list — and it's very simple.
1. Flow and (automated) triggers
Here, we're looking at an automation (or “flow”) that is triggered by uploading a file to a SharePoint document library. This trigger can be used, for example, when a file is to be moved automatically or data is to be read in from a source and transferred to a target environment.
Every flow starts with a trigger. A trigger is an action that triggers the flow. Power Automate is basically between automated flows (these are started in response to a defined action), immediate flows (these are started manually) and planned flows (these are started at a specified time or at a specified interval).

In this example, we use an automated trigger. Microsoft offers a variety of triggers to choose from. We select the trigger “When a file is created in a folder.” This trigger checks a folder in the defined SharePoint and starts the flow if a file should be stored in this folder.
In this example, we want to export data from an Excel file to a SharePoint list. To do this, we define the desired SharePoint in the “Website address” field and the desired folder in the “Folder ID” field. Please note that the folder must be within the defined SharePoint.
In order to make the query dynamic - i.e. to be able to read the data regardless of the name of the file - we retrieve the properties of the stored file. After the trigger, we have to incorporate this step into the flow as the next step.
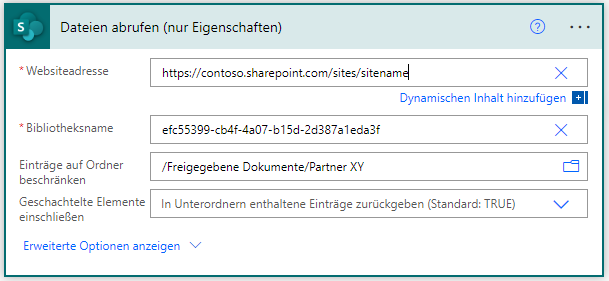
The properties of a file enable us to set dynamic values in the further steps of the flow.
2. Loop function for repetitive work steps
In the following illustration, we use a loop function to repeat a work step. This function is called “Apply to all” and we use this loop in conjunction with another “Apply to all” loop to read out the individual lines of the Excel file.
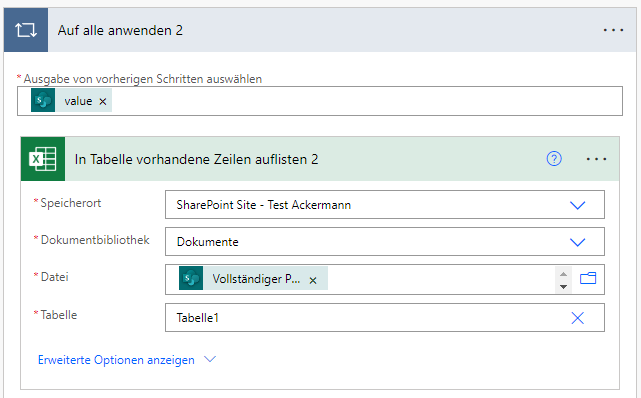
In order to identify the file and the area within the file to be viewed, the data is read out using the step “List existing rows in the table”. To do this, the location of the file must be specified. To set this dynamically, we enter the value “Full path” in the “File” field. This gives us the path of the file that triggered the flow. We must then determine the table defined in the Excel file.
3. One more loop
We then use a second “apply to all” loop to transfer the rows contained in the “List existing rows in table” step to a SharePoint table.

Attention: Please note that the Excel and SharePoint tables must be formatted the same way. This means that the column names within the Excel file and the SharePoint table must be congruent. In this example, the columns “Title”, “Date”, “Project”, “On Site” and “Description” are used.
The date field has a special position here, as date information is stored in Excel in the form of an integer number value. To represent this value in date format in SharePoint, the data must be converted using the following formula:
The result of the flow is the transfer of data from the saved Excel file to a created SharePoint list.


And voila — we're done!
From here, you can connect various other flows. In a PowerBI report, for example.
By the way: To prevent users from designing flows that can compromise IT security or collect data unnoticed, Power Automate offers an admin center. Here, the integrable software can be restricted in order to protect business-critical data and systems.
The flow shown here is just a fraction of the automation options that Power Automate offers.
Would you like support in analyzing, identifying and automating your own workflows? Or would you like to learn further steps in a coaching or workshop? Feel free to talk to us. With a 360-degree approach, we help you create real added value for your company.


